blog
October 6, 2023 | Source: Rapid Micro Biosystems, Inc.
RAPID READY: QC Automation in Three Steps
POSTED BY Rapid Micro Biosystems | 7 minute read
Learn more by getting in touch with Rapid Micro Biosystems today

Learn about the important advantages Growth Direct offers your facility

Once you decide to automate your microbial quality control with the Growth Direct® System, what’s next? The short answer is partnership. With well over a hundred system placements for commercial customers since 2009, Rapid Micro Biosystems has the experience and comprehensive services to help make your automated QC Micro lab a reality.
To illustrate the process, let’s follow a typical customer through the three steps of implementation.
At the outset, each customer has an important role to play in assessing site readiness. It helps to have a project manager or facilities manager who can support and assist in managing the installation, laboratory planning, and preparation to facilitate any required changes and activities – not only in advance of the install, but during the day when installation takes place.
Laboratory design, capacity, and available space should all be addressed prior to purchase, ensuring that the lab has the appropriate designated area (floor space, wall space, and ceiling height) to handle the assembled system, which measures approximately 241 cm high x 145 cm long x 99 cm deep (95” h x 57” l x 39” d) and weighs over a ton. Be sure to incorporate space for personnel to access, navigate around, and perform testing on the system when measuring the designated area.
During the installation, confirm there is a cleared access route through the facility for the installers to deliver the system to the final location for assembly. Check access points such as hallways, doors, elevators, to confirm a clearance of at least 6’ x 3’ for the larger disassembled parts.
Once a customer signs the pre-install agreement, the next step is to consult with a local utilities advisor to review the disclosed details on compressed air and power supply requirements for installing the Growth Direct® System. The utilities' availability should be confirmed, or required adjustments and laboratory site work should be completed, prior to the day of scheduled system installation.
There are five stages for the installation of the Growth Direct® System:
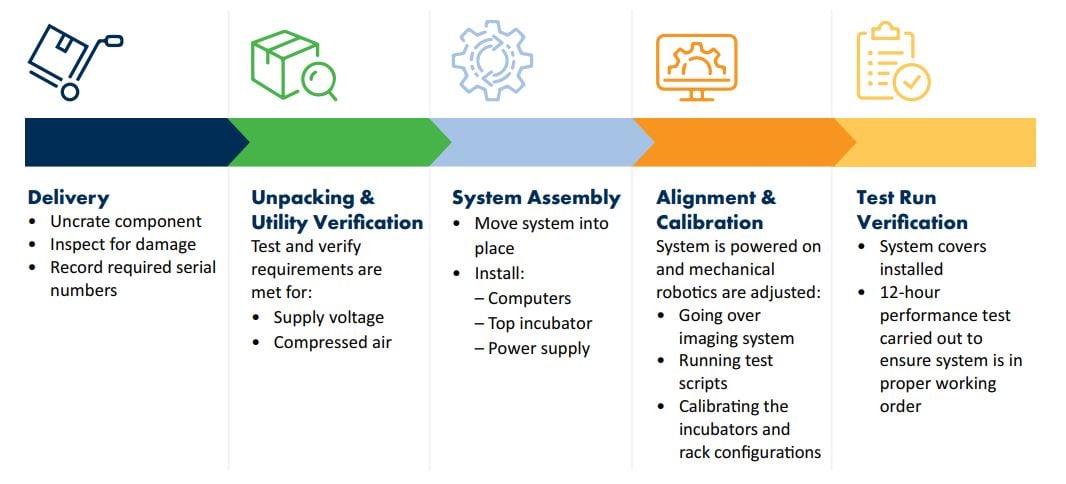
All stages are documented in a comprehensive installation record, ensuring the quality of a thorough installation, safety of the instrument, and continuing with complete training for our customers. For easier implementation, here are six tips to keep in mind.
LEARN MORE
Q&A: Kham Nguyen on Pharma 4.0, LIMS Integration, and System Validation
Before routine use can begin, companies implementing our Growth Direct® System must validate their systems with stakeholders, quality assurance personnel, and external regulatory agencies. The four key phases are:
Depending on the customer’s internal quality team’s availability, Rapid Micro Biosystems aims to complete the total validation process in four to six months while also providing:
After installation, RMB will also follow up with a variety of support services. These can include testing at our reliability lab to improve system availability, advanced remote monitoring support, rapid response email alerts to prevent extended downtime, and preventative maintenance visits to help ensure that the system stays up and running 24/7.
The “why” of automating QC labs is clear, as pressures to improve speed, scale, and scope increase. Once you decide to automate, Rapid Micro Biosystems can show you how. If you have questions and wish to speak with an expert about our Growth Direct® System, contact us today.

